Easter’s just 2 weeks away! Do you have your Peeps yet? If not, here’s a great Foodwhirl challenge for you… Make your Own! Foodwhirl Friend Melissa did some fun experiments making homemade marshmallow chicks, and shares her techniques and results for you here! She says she doesn’t think hers will win any beauty contests (although I think they are kinda cute!), but they were totally delicious. And this would be a great project to do with kids, too! Think you can do better? Try it yourself and send us your results! We’ll show ’em off to the world!
Homemade Marshmallow Chicks
My name is Melissa….and I am a marshmallow-holic. On more then one occasion I have been caught sneaking the delicious, puffy, white morsels straight out of the bag and into my mouth. It’s true, at one time in my life I may have enjoyed eating mini marshmallows by the handful, sans hot chocolate. Admitting you have a problem is the first step right? Well, while my hips might say otherwise, I don’t really see this addiction as a problem and well… I am just not ready to give up quite yet. In fact, with Easter just around the corner, I have made a move in the opposite direction and I actually took a stab at make some of these creamy, sticky, and gooey puffs of joy myself. I recently saw one of my favorite TV Chefs demonstrate how, with the right tools, this is really an easy process to do at home. Keeping in mind the Easter theme, I thought I might take this project one step further and see if I couldn’t craft this intoxicating concoction into a homemade version of those cute little edible farm animals that stuff shelves and Easter baskets across the nation. That’s where things got a little dicey.
I used Alton Brown’s recipe for making the marshmallow, available here Homemade Marshmallows. This process was fairly simple and straight-forward, but as I mentioned, there are a few key tools you’ll need. Most importantly, and really I am not sure you can do this without it, is a stand mixer. Marshmallow is basically a sugar syrup whipped into a high frenzy incorporating copious amount of air into the syrup giving it the light and fluffy texture. Unless you have the forearms of a championship wrestler, I am not sure you could manually whip the thick syrup with enough vigor to incorporate the necessary air. The second tool I think this would be hard to do without is a candy thermometer. Sugar syrups are sensitive and volatile solutions. The ratio of water to other compounds in the syrup can make a huge different in how your final product turns out. For marshmallow, you need to get your syrup to the “soft ball” stage, or 240°.

Steps: Click to see larger
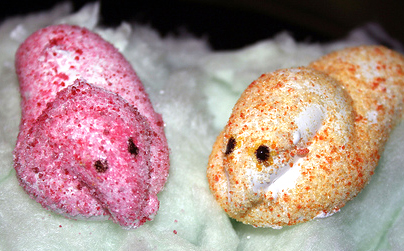
Given you have the tools above, making homemade marshmallow is really not that difficult and they turn out quite tasty. Taking the finished results and turning them into anything more the simple squares however, takes speed and finesse (the second of which, I am sadly short of). I found two tutorials via Google regarding shaping freshly made marshmallow into those cute and edible little creatures. One had great pictures, but little in the way of instructions and the other had some good tips, but not much in the way of visuals. Bringing together what I could from each, I loaded two piping bags with the marshmallow (a tricky task in itself) and cut about a 1/2″ diameter opening in the bottom. Because as it is exposed to air, Marshmallow dries out and becomes less pliable, shaping it quickly once it is done mixing is vital. Starting from what would be the back of the chick and pointing the end of the bag towards my body, I squeezed a healthy-sized strip towards myself. Then angling the bag back away from my body, I would squeeze a second level of marshmallow half-way across the top of the initial layer. Then I would decrees the pressure on the bag and pull it back towards my body in a quick motion to make, what was to be the pointy beak. Well, 2 cookie sheets and a good portion of my counter top later, I had a veritable army of what looked more like marshmallow elephants (or as one of my friends dubbed them, Marshmallow Muppets) and a lot of indecipherable blobs. Not to give in completely to discouragement. I went ahead and mixed up a few batches of colored sugar while the marshmallows cured for about 30 minutes and tried to coat the best looking ones. While I’m not sure they would win any beauty contests, these chicks still turned out yummy to the taste buds and were certainly a big, sticky, and fun project to attempt. Once I recover from my sugar-induced coma I may even attempt to make these again….well, maybe next Easter.

Finished Peeps on a Cotton Candy Cloud!
A few other notes about this: Depending on how long you beat the marshmallows with your mixer, you have some control as to how stiff the marshmallow cream is. I ran mine for 15 minutes, thinking a stiffer cream would make for holding a shape better. In retrospect, I think I still needed to give it a few more minutes in the mixer to become that much stiffer. As I was piping the cream, it was still a bit viscous and I think that accounted for the blob-like results. Unfortunately, I am not sure there is an exact time someone can say is needed for the perfect consistency, appears that it is more of a trial and error type practice. Also, I had coated my pans and counter top with a mix of the flower and corn starch so that I would eventually be able to remove the marshmallows once they had cured enough to sugar-coat. This worked for keeping them from sticking to the work surface, but counteracted the sugar from adhering to them. In a fit of desperation, I found a squirt bottle of water and started to gently mist the marshmallows and then rolling them in the sugar. This worked fairly wall, as long as they only got a very light mist of water. Too much and the sugar would stick in unattractive clumps.
Thanks Melissa! Now that you’ve said how easy this is I just may have to try it myself!
See more about Melissa and her other yummy recipes here!